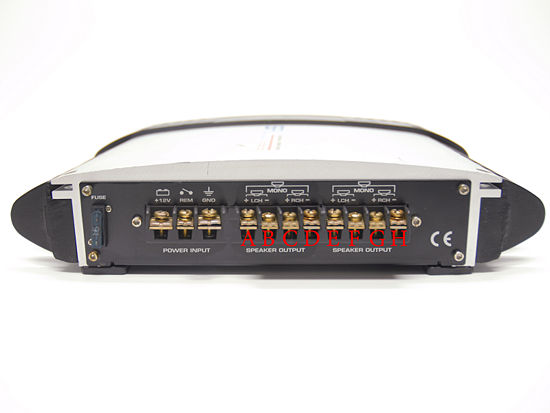
1-1) Make sure your amp can be bridged. This should be indicated on the documentation that came with the amp. If the amp is used or lacks documentation, go online and check for the specifications on the manufacturer's website
.
1-2) Understand that bridging your amp will cut your channels down by half. A two-channel amp can be bridged to one channel and a four-channel amp, to two channels
Bridge a Two-Channel Amp
2-1) Know the layout of your equipment. On your two-channel amp, you should see 4 terminals: a positive (+) and a negative (-) for channel 1 and the same for channel 2. Let's label each terminal as follows:
Chanel 1 : A (positive) B (negative)
Chanel 2 : C(positive) D(negative)
2-2 ) Connect the amp to one speaker.
Connect the red (or ribbed) speaker wire to terminal "A.”
Connect the black (or non-ribbed) speaker wire to terminal "D."
Bridge a Four-Channel Amp
3-1)Know the layout of your equipment. On your four-channel amp, you should see 8 terminals: channels 1 through 4 each have a positive (+) and negative (-) terminal. Let's label each terminal as follows:
Channel 1
“A” (positive)
“B” (negative)
Channel 2
“C” (positive)
“D” (negative)
Channel 3
“E” (positive)
“F” (negative)
Channel 4
“G” (positive)
“H” (negative)
3-2) Connect the amp to the first speaker.
Connect the red (or ribbed) speaker wire to terminal "A.”
Connect the black (or non-ribbed) speaker wire to terminal "D."
3-3) Connect the amp to the second speaker.
Connect the red (or ribbed) speaker wire to terminal "E.”
Connect the black (or non-ribbed) speaker wire to terminal "H."
Exemple VIDEO :


No comments:
Post a Comment